Using Django Tastypie And Backbone.js To Create RESTful APIs
Over the years, Math and Pencil has gone from developing Django applications from mostly backend applications written in all Python to developing large front-end applications using Backbone.js + RESTful APIs. There are a lot of reasons for this, but in general, one-page javascript apps tend to flow a lot more smoothly - you can avoid full page requests using Backbone.history, and you can write a lot less code by using RESTful API calls to update data on the server.
There are a few different frameworks for setting up RESTful API calls using Django’s ORM. For Postgres/MySQL backends, the following frameworks are available
For MongoDB:
The purpose of this tutorial is to explain how to setup a simple REST API using Django Tastypie and how to setup Backbone.js to retrieve this data from the API. This tutorial assumes you have a project with models already defined and data in your tables (although I added a South datamigration to bootstrap the database w/ three dummy users). For purposes of an example, we are going to add a REST API for Django’s built in User model.
Server-side setup w/ Django
The first step is to use pip to install the latest version of the framework
pip install django-tastypie
Next, you need to create a resources.py in the accounts directory. The resource file is where we define the details of the REST API. In the resource file, lets define the UserResource class:
class UserResource(ModelResource):

	class Meta:
		queryset = User.objects.all()
		resource_name = 'user'
		allowed_methods = ('get', 'post', 'put','delete', 'patch')
		filtering = { "id" : ALL }
After your resource class is defined, you need to tell Django the resource exists. This can be done by setting up the proper calls in the the main urls.py file:
urlpatterns = patterns('',
    # Examples:
    # url(r'^$', 'django_tastypie_tutorial.views.home', name='home'),
    # url(r'^blog/', include('blog.urls')),

    url(r'^admin/', include(admin.site.urls)),
)


v1_api = api.Api(api_name='v1')
v1_api.register(account_resources.UserResource())

urlpatterns += patterns('', (r'^api/', include(v1_api.urls)))
Now that the API is setup, assuming the user table in your database contains data, go to the following url in a browser:
http://127.0.0.1:8000/api/v1/user/?format=json
You should see the following output:
{"meta": {"limit": 20, "next": null, "offset": 0, "previous": null, "total_count": 3}, "objects": [{"date_joined": "2014-07-12T20:45:16.823123", "email": "joe@example.com", "first_name": "", "id": 1, "is_active": true, "is_staff": false, "is_superuser": false, "last_login": "2014-07-12T20:45:16.823077", "last_name": "", "password": "", "resource_uri": "/api/v1/user/1/", "username": "joe@example.com"}, {"date_joined": "2014-07-12T20:45:16.825555", "email": "tim@example.com", "first_name": "", "id": 2, "is_active": true, "is_staff": false, "is_superuser": false, "last_login": "2014-07-12T20:45:16.825510", "last_name": "", "password": "", "resource_uri": "/api/v1/user/2/", "username": "tim@example.com"}, {"date_joined": "2014-07-12T20:45:16.827626", "email": "sam@example.com", "first_name": "", "id": 3, "is_active": true, "is_staff": false, "is_superuser": false, "last_login": "2014-07-12T20:45:16.827584", "last_name": "", "password": "", "resource_uri": "/api/v1/user/3/", "username": "sam@example.com"}]}
Client-side setup w/ Backbone.js
Setting up the client side is a bit easier if you are familiar with Backbone.js.
First, you’ll need to import jquery, backbone, underscore, and backbone_tastypie.js into your html header. After all of the javascript is imported, define your User model and Collection using backbone.js.
The model and collections “classes” should look something like this:
EXAMPLE.MODELS.UserModel = Backbone.Model.extend({

	initialize: function() {
	},

	urlRoot : function(){
    	return '/api/v1/user/';
	},

});


var Users = Backbone.Collection.extend({

	model: EXAMPLE.MODELS.UserModel,

	url : '/api/v1/user/',

});

EXAMPLE.COLLECTIONS.Users = new Users;
You can open up the Chrome console and call fetch on this collection and then use the collection’s toJSON() method to confirm your new REST API is returning data from the server.
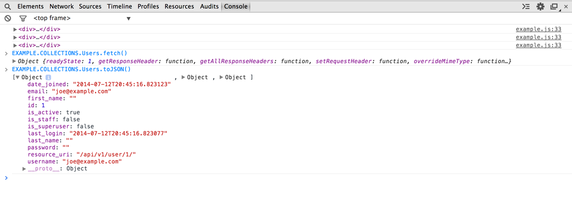
It is important to understand that in my example, backbone_tastypie.js is doing the heavy lifting formatting the data that is being returned from the API into the Backbone collection. This file is absolutely required for the tutorial to work.
Finally, I provided a very small app that lists the contents of the collection. The App contains two backbone views: one that list the content of each model, and another that listens for a reset event on the the collection and then renders the app on this event:
EXAMPLE.VIEWS.ExampleListItem = Backbone.View.extend({

	tagName : 'div',

	initialize : function(model, options){
		this.options = options
	},

	events : {
	},

	template : _.template("<div>username: <%- username %> email: <%- email %> id: <%- id  %></div>"),


	render : function() {
		this.$el.html(this.template(this.model.toJSON()));
		return this;
	}
});


EXAMPLE.VIEWS.ExampleList = Backbone.View.extend({

	el : "#my-model-list",


	initialize : function(options){
		this.listenTo(EXAMPLE.COLLECTIONS.Users, 'reset', this.addAll, this);
	},

	addOne : function(model) {
		var view = new EXAMPLE.VIEWS.ExampleListItem ({ model : model })
		console.log( view.render().el )
		this.$el.append(view.render().el)
	},

	addAll : function(){
		var that = this;
		EXAMPLE.COLLECTIONS.Users.each(function(model){
			that.addOne(model);
		});
	},

	render : function() {
		this.$el.html(this.template());
		return this;
	}

});
You’ll also notice in my accounts/index.html that I have to force a reset on the collection by passing the reset=true parameter to the fetch call:
EXAMPLE.COLLECTIONS.Users.fetch({ reset : true })
If you open up your browser and go to
http://127.0.0.1:4000/
You will see the list of models in your collection, displayed using backbone.js sync method.
Adding custom methods
REST is great, but lets face it, it cannot solve every problem. Sometimes you need to define your own custom APIs. Especially when you have to update two models in one request, if you want to send an email via AJAX, etc. I have provided an example of a custom login method in the UserResource file handle_login.
class UserResource(ModelResource):

	class Meta:
		queryset = User.objects.all()
		resource_name = 'user'
		allowed_methods = ('get', 'post', 'put','delete', 'patch')
		filtering = { "id" : ALL }

	def prepend_urls(self):
		return [
			url(r"^(?P<resource_name>%s)/login%s$" %
				(self._meta.resource_name, trailing_slash()),
				self.wrap_view('handle_login'), name="api_login"),
		]

	def handle_login(self, request, **kwargs):
		username = request.REQUEST.get("username")
		password = request.REQUEST.get("password")
		user = authenticate(username=username, password=password)

		msg = ""
		success = True
		next_url = ""
		if user:
			login(request, user)
			next_url = reverse('events:add')
		else:
			msg = "Invalid Username or Password"
			success = False

		return self.create_response(request, { 'msg' : msg, 'success' : success, 'next_url' : next_url })
This API call could be used to log a user in via an AJAX request using his/her username and password.
Limiting Access To Data
By default, the API I created allows any authenticated/non-authenticated user to perform any REST actions GET/PUT/DELETE/POST. This is obviously not ideal for a production application. To limit what data the API returns, Django-Tastypie provides a series of methods you can override. For example, lets say you have cat model that has a user attribute (foreign key). The user attribute specifies the person who created the cat object. If you want to change the API so only the user that created cats can update their cat objects, you would add the following methods to the Tastypie model resource class:
def authorized_create_list(self, object_list, bundle):
	return object_list.filter(user=bundle.request.user)

def authorized_create_detail(self, object_list, bundle):
	return object_list.filter(user=bundle.request.user)

def authorized_read_list(self, object_list, bundle):
	return object_list.filter(user=bundle.request.user)

def authorized_read_detail(self, object_list, bundle):
	return object_list.filter(user=bundle.request.user)

def authorized_update_list(self, object_list, bundle):
	return object_list.filter(user=bundle.request.user)

def authorized_update_detail(self, object_list, bundle):
	return object_list.filter(user=bundle.request.user)

def authorized_delete_list(self, object_list, bundle):
	return object_list.filter(user=bundle.request.user)

def authorized_delete_detail(self, object_list, bundle):
	return object_list.filter(user=bundle.request.user)
These methods will limit access to all HTTP verbs so only the logged-in creator of an object can retrieve/create/update/delete it.
Adding Custom Attributes To Tastypie Responses
Sometimes it is useful to add custom attributes to the responses being returned from your REST API. To do this with Tastypie, you can add these attributes to the dehydrate method. The following example uses Python’s datetime module to reformat the three date attributes in the Tastypie response:
def dehydrate(self, bundle):
	bundle.data['created'] = bundle.data['c'].strftime('%m/%d/%Y')
	bundle.data['modified'] = bundle.data['m'].strftime('%m/%d/%Y')
	bundle.data['date'] = bundle.data['date'].strftime('%m/%d')
	return bundle
A final note - I am not going to go over authorization or authentication, but there are a number of options that can be found in Tastypie’s authorization and authenication classes. Sometimes, it is also useful to be able to serialize an ORM model/queryset using Tastypie’s serialization methods. I could not find an easy way to do this, so I wrote the following two custom methods that seem to work great. I copy them into almost every Django project I start these days.
def serialize_all_resource(cls, request, content_type="application/json"):
	res = cls()
	request_bundle = res.build_bundle(request=request)
	queryset = res.obj_get_list(request_bundle)

	serialize_resource(cls, request, queryset, content_type)

def serialize_resource(cls, request, queryset, for_model=False, content_type="application/json"):
	res = cls()
	bundles = []
	for obj in queryset:
		bundle = res.build_bundle(obj=obj, request=request)
		bundles.append(res.full_dehydrate(bundle, for_list=True))

	if for_model and queryset.count() == 1:
		return res.serialize(None, bundles[0], content_type)
	return res.serialize(None, bundles, content_type)
If you are interested in Django, machine learning, math, and/or statistics you can following me on twitter: @josephmisiti
The code for this tutorial can be forked from our github account
If you need help with Django or Machine Learning, contact my firm at info@mathandpencil.com